Homeschool Art Class: Optical Art
I have a daughter in 6th grade this year, so I decided to teach a homeschooling art class for her and open it up to our community. I built our curriculum out of her interests, topics from our state standards, and basic art skills and topics. I'm sharing the whole homeschool art class for free here! This week's topic was Optical Art, or OpArt. I gave the kids in the class their choice of projects, and this sphere was my daughter's:

Homeschool Art Class:
Optical Art:
Supplies:
* paper (I used sketch paper because I love its texture)
* a circle to trace (I've used a lid and a cereal bowl)
* ruler
* black permanent markers
* charcoal
Time:
* 15-20 minuets of instructions and demonstrations
* 2 hours to complete the project
* paper (I used sketch paper because I love its texture)
* a circle to trace (I've used a lid and a cereal bowl)
* ruler
* black permanent markers
* charcoal
Time:
* 15-20 minuets of instructions and demonstrations
* 2 hours to complete the project
Lesson:
First we talked about what optical art is (art that forms an optical illusion), and how curved lines and shadows work together to give an impression of depth and dimension. We also scrolled through some examples of optical art online and identified curved lines and shadows.
Here are the steps to make this OpArt Sphere:
1- Trace the circle onto the paper. Use a straight edge to make equally spaced grid lines that do NOT go through the circle. Do this all fairly lightly with a pencil so you can erase any changes:


2- Make grid lines inside the circle. You want to use as many curved lines inside the circle as possible, because these will create the 3-dimensional illusion. I started by drawing a straight line through the diameter, in any direction. Draw this line LIGHTLY because you will erase it in just a moment. I called this line the "mirror line:"
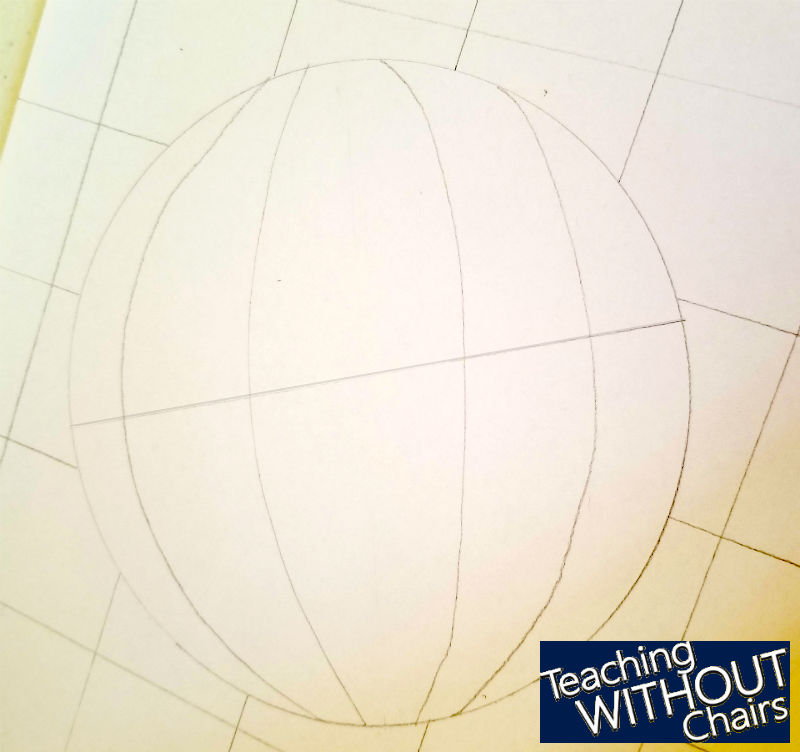
Draw two curved lines on each side of the mirror line. The curved lines should "reflect" close to the same angle around the mirror line. Then draw a second mirror line perpendicular to the first one. Erase the first mirror line. Draw two more curved lines on each side of the second mirror line. Erase the second mirror line. You will have something that looks similar to this:

I have seen some people make these without erasing the two mirror lines, and it still works out great. I just like how it looks better to have no straight lines inside the sphere.
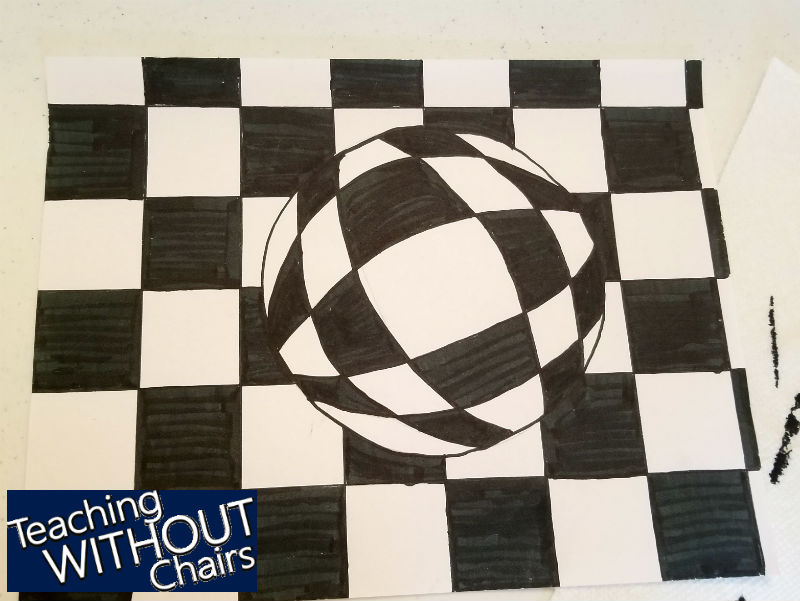
3- At this point, you want to mark every other square on the background grid. Placing an "x" or some other mark in pencil lets you make sure you know which squares you will be coloring in and which you will be leaving blank.
4- Also mark every other "square" inside the sphere.

5- Trace over all your lines with a permanent marker. Use the straight edge and circle you traced earlier to help.

6- Color in each section you marked earlier. I like do all the spaces inside the sphere first, then do all the background squares.

Make sure your table has something covering it like extra paper or a disposable tablecloth so that when you color the edges you don't color on your table. ;)
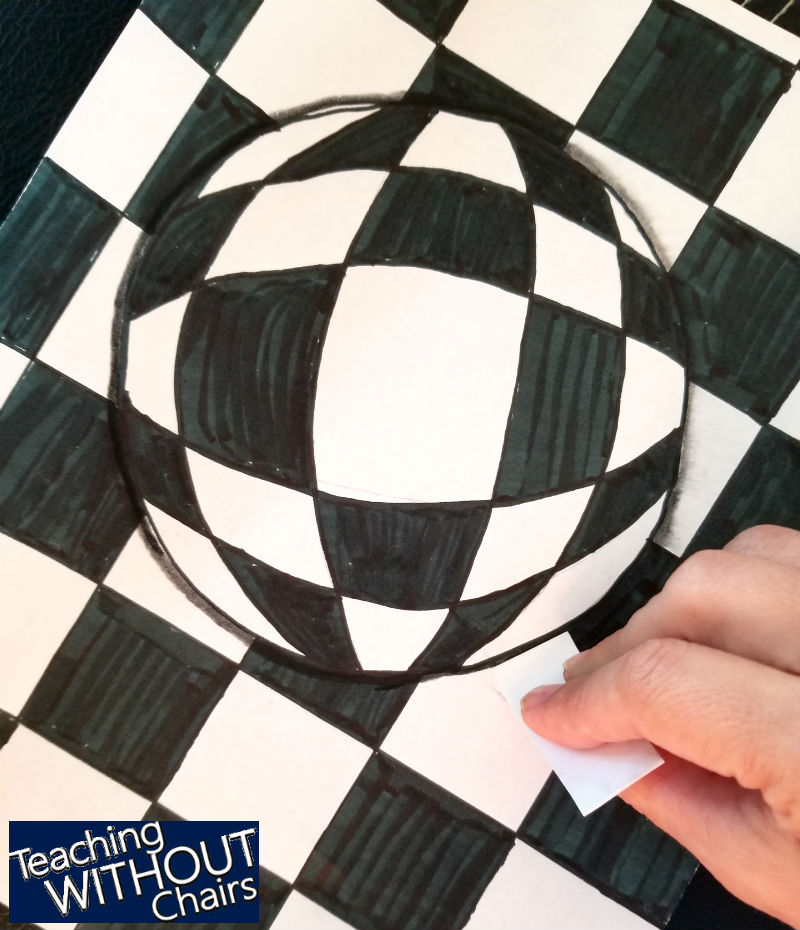
7- The final step is to make a shadow. We drew a thin line around the entire circle with charcoal, then used a piece of cardstock to "pull" the shadow away from the sphere. Just press the edge of the cardstock against the charcoal line, pull it away from the sphere, lift up the cardstock, place it down on the charcoal line again, and repeat...all the way around the sphere.
Be careful not to get it on your fingers or your hand--it usually gets smudged onto other parts of the project if you do that!
An alternative is to draw a drop shadow or a shadow from another angle on one side of the sphere. I like the shadow going all the way around the sphere more--it looks like there is an overhead light source and it is easier for the kiddos to figure out how to draw it.
And that's it! All done! Be sure to display it somewhere cool to show it off!
We would love to have you join us in our homeschool art class! The curriculum includes optical art, print-making, clay, foreground and background, painting, paper-mache, and more! Check back next week for the next lesson!
We would love to have you join us in our homeschool art class! The curriculum includes optical art, print-making, clay, foreground and background, painting, paper-mache, and more! Check back next week for the next lesson!
And if you're looking for more homeschool unit studies, be sure to check out our growing collection here!

Happy Educating,
Carla & the kids who don't sit still!


0 comments